Trying to Balance an Art-Filled... Love-Filled... Health-Filled... Fulfilled Life!

Monday, May 19, 2008

Savor the last of Spring with a Crowd Pleaser


As mentioned before, serving up a meal for our huge family can be quite the feat. However, here is one more meal that was a big hit for our last Sunday Supper get-to-gether. I guarantee this will be one of the best hams you have ever tasted (and the easiest to prepare!).


Honey-Mustard Glazed Ham prepared in a slow cooker

You will need:


  1. Spiral sliced ham (we usually find the largest one that will still fit in our slow cooker


  2. 1 6-8oz jar of honey


  3. 1 stick of butter


  4. 1/2 cup of brown sugar


  5. 3 tablespoons of stone ground mustard


  6. 1 teaspoon of mustard seed (if you have it...)


  7. sprinkling of ground cloves over the ham(to your taste)


  8. You may also add a can of crushed pineapple including juice if you like that with ham, we usually just stick with the honey mustard.


Unwrap the ham, remove all plastic and place in the slow cooker fat side up. Melt the butter in a microwave safe bowl, add honey, brown sugar, and mustard, mix well with a fork. Sprinkle ham with cloves and then add entire glaze mixture overtop. Seal up slow-cooker and set to high. Cook 4 hours. Every once in a while you can spoon some of the glaze over the top of the ham. Don't forget to try a nibble...just for quality control:)


For simple sides, heat oven to 425, coat fresh asparagus with olive oil, sea salt, and cracked pepper, lay in single layer baking dish, and roast for 15-20 minutes.


In a separate pan, lay out diced red potatoe (skin still on, about 1/2" dice) coat with olive oil, plenty of sea salt, cracked pepper, thyme, parsley, oregano, (whatever herbs you like...just becareful with rosemary, a little goes a long way...), toss together, spread out onto baking sheet and throw in the oven with the asparagus. Once the asparagus is done, take spatula and turn over the potatoes, and cook for an additional 10 minutes. (You can add 1-2 tablespoons minced garlic and cook for another 5 minutes...just don't burn the garlic).


Voila! An elegant, simple, Sunday dinner with less than 1/2 hour prep time.


For Desert, slice up some fresh strawberries, sprinkle with sugar, spoon over pound cake or angel food cake, add add fresh whipped cream


.

Wednesday, May 14, 2008

Traditions Revisited

As many of you know, we come from a very close knit family. One of our most favorite things to do is to be together, and of course, to eat. For such a large family (seven siblings all together), there wasn't always a lot of money for life's luxuries, but one thing we splurged on was going out to eat. And, yes, I agree with many financial gurues, that this was probably a tremendous waste of money, but I think the family is all the better for the quality time we set aside to spend together. We were quite the sight, Mom, Dad, and seven little followers entering the restaurant. Thank God, we were pretty well mannered. Even as we all grew up and out of the house, we still made time to get together after church on Sundays to eat lunch together at some restaurant.
However....we are now encountering a huge and ever growing problem...our family is just getting too big to get together at a family friendly restaurant. And even family friendly restaurants require somewhat well behaved children, and maybe its because I have two little boys, and we were mostly well behaved young ladies when I was young, but I've come to the understanding that I would have to be crazy to try and bring both a toddler and an infant to a restaurant and expect to get any food actually ingested. My sister Mary discovered this about 2 years ago once her second child was born, when I was still judging her, thinking that my first little angel was just perfect in restaurants at that point. And now, my sister Rachel is about the experience the joy too with baby boy number 2!
So, we've begun to improvise, and this is where the topic of Traditions Revisited comes from. I have a couple warm, fuzzy memories of going to my great-grandma's tiny little home on Sundays after church and eating Fried chicken dinners with her, my grandparents, my parents, and sometimes an aunt and uncle, a cousin or two. And although I was very young (probably around 7 or so), I still remember those times with a lot of joy. So for the last month, my mom and I have been trying to alternate preparing a very simple Sunday lunch for whatever family can make it over. I am far too busy to try and fry chicken for what can sometimes be a get together of 15 people, but I have discovered a few very easy, yet still fancy enough ideas for a very nice Sunday dinner. And all of a sudden, what was once an old far-off tradition, is becoming new. Maybe it is the spring air combined with what just seems like such a beautiful and what was once normal standard for families, but it has made my Sundays feel like a family day once again. Running a business can end up being a seven day a week job, and setting this day aside to entertain my loved ones, has been very relaxing actually. My elderly grandma is now comfortable enough to join us for these lunches (she was always a little hesitant to brave the chaos of restaurant dining with our crew), I have been able to sit and talk with aunts that I have long missed fellowship with, and best of all, my two year old can run and play once he's done eating, and mommy can still try and eat something!

Martha Stewart I am not though, so here is one working mom's tips for an easy, delicious meal for a Sunday afternoon. I will try and post a new idea next week (maybe with some pics too!)

1. Find you favorite frozen lasagna, buy a big enough size that will feed all your anticipated guests, (plus a couple more servings in case you decide to invite more). Since we head off to church on Sunday mornings, I set the oven about 25-50 degrees cooler than the directions state so that I can leave the lasagna in for an extra 45 minutes or so (just make sure it is still loosely covered).

-For sides, buy a bag of baby spinach leaves and toss in small amount of water and lemon juice once your back from church and browning the top of the lasagna. Bring the water up to a boil and allow the spinach leaves to just wilt (don't overcook them...and don't be afraid to salt them...nothing like bland slimy vegetables in my humble opinion.) The lemon juice works great to cut through any bitterness. The spinach tastes great with the ricotta cheese from the lasagna and will help take away the guilt from such a sinful main entree!

-We also love the Ceasar salads in a pack, have your mom or sister or whoever (even my hubby could manage this chore), toss together packet ingredients in a big salad bowl.

-Splurge on a great loaf of artisanal bread from a good local grocer's bakery. Have soft butter or herbed olive oil waiting, and dig in. A high quality crusty bread just seems to elevate the rest of the meal, and usually is only an extra 2-3 dollars that added sense of luxury.

If you pick a good lasagna, and let is set up for about 5 minutes after cooking, open up a really nice bottle of red wine (still probably less expensive than a by the glass charge at the restaurant), and dig in, you should be rewarded with a fun family experience that is just as delicious as the local chain Italian restaurant, and a little less hectic for a large close-knit, and in our case loud family!


Monday, May 12, 2008

Casual Dining with Eco Chic Style


Check out Sarah's recently published article on the Eco-advantages of casual outdoor entertaining on Melamine/Acrylic Tableware at: http://directory.homestead.com/article/eco-conscious-outdoor-entertaining.

Several of our new designs that we created for 2008 are just now arriving, so be sure to check out our latest collections. We love the vibrant colors and global themes, from gourmet wine country, Asian florals and bamboo, the lemons of Sorento, Italy, Japanese cherry blossoms, and so much more. Stock up before Memorial day and save on shipping on orders over $100.00

Sunday, May 11, 2008

The proper care and feeding of May Flowers (sans Pilgrims)

Spring's bounty is in full bloom, but some of her best show stoppers last only a moment, and then it is up to those of us that love her, to clean up after the parade of colors, in preparation for next year's exhibition.

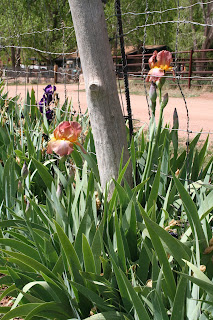
I have always loved Irises, their beauty made an impression on me at a very young age, and have inspired many works of art. This is my second spring up in Pine, and the profusion of Irises in gardens, along fence lines, and in open fields, warms my soul, just as the sun has begun to warm our high country, finally this month. Like most residents of Arizona, Irises love the sun, so keep in mind placement when preparing for next years plantings.


As the iris bloom doesn't last more than a couple of weeks, it is important to remove (or dead head) the spent blossoms as they fade. This will help your plants focus their energy on this years series of blooms on each stalk, and also preserve nutrients and energy for rhizome (what I used to call bulb) proliferation and reproduction rather than seed production. For this same reason, be sure to leave the greenery alone all summer until it naturally fades, then dead leaves should be removed. These leaves are essential to the photosynthesis (energy production) for the future health of the rhizomes and next year's flowers.


If your patch of irises is becoming thick and overgrown, it is probably time to thin them out, and either plant another area of your yard, or share your beauties with neighbors and friends. Thinning your iris patch shouldn't be overwhelming or intimidating and should be done as needed every 3-4 years. With a nice sharp shovel, simply dig underneath the rhizome grouping and gently rock the shovel, loosening the roots from the dirt, the patch should then come up easily. Brush off all of the loose soil, and with a sharp knife, divide the rhizomes into individual sections. (Each section should have a shoot of foliage on top and root clumps on the bottom, and is usually the size of a medium sized potato. These foliage off shoots can be cropped with a clean pair of scissors like a fan, keeping about six inches of foliage above the rhizome. Be sure to throw away any rhizomes that appear rotted (they are usually much lighter than the good rhizomes and may appear much darker, or have fuzz or mold growing on it's surface). The remaining rhizomes can be planted immediately in a sunny well draining area of your yard, or stored in a cool, dry, well ventilated corner of your garage or tool shed. Iris rhizomes may be planted up until late November in Arizona. Be sure to plant shallowly (the top of the rhizome and leaf fan should be above ground), in nicely mulched soil. Irises love bone meal, however so do many of the Rim country's critters, so talk with the local nursery for advise on the best alternatives for feeding your irises if they are out in the open. Showy bearded irises and the standard field irises love water, but hate wet feet, so make sure that the area drains well to avoid rotting your rhizomes.

If you are a lucky owner of these beauties they might just reward you with a second blooming in the early Fall (never guaranteed but always a pleasure when it happens).
Now the lilac flowers seemed to come and go in even less time, but their fragrant burst of lavender and white colors filled my mom's cabin with amazing ambiance and sweetness while they lasted. The lilac bush does well with a nice pruning, but the pruning should be done with some basic knowledge under your belt. The spent blooms should be removed immediately after fading, and lilac bushes love good circulation, so cut back any overlapping branches deep inside the bush towards the bottom. New growth can take up to three years to produce blossoms, so be sure to leave some older established branches for next years bounty. Also beware that the shrub begins to form next years blossoms now, so do not cut off the small nubs of beautiful blossom potential haphazardly. If all the branches are lopped off in this manner, next year's flower display can be severely minimized. In my personal opinion, think natural while pruning your shrub, the inherent beauty of a lilac bush is its wildness and organic form.


See Sarah's full article in the Payson, Arizona Newspaper The Roundup at http://www.paysonroundup.com/section/localnews/story/34410